####################################################################################
# SCRIPT: web-srv-tst.sh
#
# AUTHOR: Pandey, Deep Chandra
# Citagus Software Pvt. Ltd.
#
# DESCRIPTION:
#
# This script is run by crontab at scheduled intervals.
# It will monitor the Peoplesoft PIA running on weblogic
#
# FILES:
#
# REVISION HISTORY
# WHO WHEN (DD/MM/YY) WHY
#
# Pandey, Deep Chandra JUly 14, 2008
#
#
#DBA to whome mail will be sent
DBALIST="deep_pandey@citagus.com";
#####################################################################################
cwd=`pwd`
WBLOG=$cwd/webstatus.log
cd /bea/weblogic92/server/bin
source setWLSEnv.sh
java weblogic.Admin -url t3://citagus-srv8:80 -username system -password citagus04 GETSTATE PIA >> $WBLOG
java weblogic.Admin -url t3://citagus-srv8:80 -username system -password citagus04 GET -pretty -type ServerRuntime >> $WBLOG
#-------> finding any Error message in the Webstatus.log file
egrep "RUNNING" ${WBLOG} >/dev/null 2>&1
if test $? = 0 # Testing the output of previous command - egrep...
then
echo "Web serer is Up and running"
#mail -s "Alert !! Web Server is Running at [$HOSTNAME] Machine" $DBALIST < ${WBLOG}
else
echo "Web server is Down"
mail -s "Alert !! Web Server is down at [$HOSTNAME] Machine" $DBALIST < ${WBLOG}
fi
mv $cwd/webstatus.log $cwd/webstatus.log.bkp
Sunday, December 28, 2008
Thursday, September 25, 2008
How do I restrict or allow a few client machines to connect to Oracle Server ?
If you do not want a particular client machine say machine of person X , connect to oracle server or vice versa.
The step are very simple , you need the following things
You must know the IP-address or host name of the client machine.
# Add the following lines in SQLNET.ora if you want to invite only the following client machine to connect
TCP.INVITED_NODES =(, )
# Add the following lines to SQLNET.ora if you want to invite all the client machine except the following
TCP.EXCLUDED_NODES=(, )
# The following is the required parameter in SQLNET.ora.
TCP.VALIDNODE_CHECKING=yes
Here is the simple example, to allows the user to connect to the oracle database with IP-ADDRESS 172.16.8.209 or 172.16.8.207 only , configure the protocol.ora as follows :-
tcp.invited_nodes=(172.16.8.209 , 172.16.8.207 )
tcp.validnode_checking=yes
Stop and restart the listener to make this effect.
Note : There are certian bugs attached with this method , check the oracle support or metalink for this for your specific platform and oracle version.
For further information check the metalink doc 185936.1
The step are very simple , you need the following things
You must know the IP-address or host name of the client machine.
# Add the following lines in SQLNET.ora if you want to invite only the following client machine to connect
TCP.INVITED_NODES =(
# Add the following lines to SQLNET.ora if you want to invite all the client machine except the following
TCP.EXCLUDED_NODES=(
# The following is the required parameter in SQLNET.ora.
TCP.VALIDNODE_CHECKING=yes
Here is the simple example, to allows the user to connect to the oracle database with IP-ADDRESS 172.16.8.209 or 172.16.8.207 only , configure the protocol.ora as follows :-
tcp.invited_nodes=(172.16.8.209 , 172.16.8.207 )
tcp.validnode_checking=yes
Stop and restart the listener to make this effect.
Note : There are certian bugs attached with this method , check the oracle support or metalink for this for your specific platform and oracle version.
For further information check the metalink doc 185936.1
Thursday, September 4, 2008
In Peoplesoft how connectivity works.
2 Tier - The Client to the Database connection is through SQL and uses the connection security like ODBC or TSN Names.
The connect ID in PeopleTools 8 and greater (or OPRID in PT 7.x) granted at the database level, has READ-ONLY rights to the following tables in order to authenticate the user:
PS.PSDBOWNER – Oracle and DB2 ONLY
PSLOCK – PT 7.5x ONLY
PSSTATUS – PT 8.x and forward releases ONLY, and all platforms
PSOPRDEFN – All tools versions and all platforms
PSACCESSPRFL – All tools versions and all platforms
Once the user is authenticated, through the check against the PSOPRDEFN table, the connection is disconnected and the user is logged in as the access id, which has full access to all PeopleSoft tables.
3 Tier - The Client to the App Server connection is through Tuxedo then the App Server makes a 2-tier connection to the database through SQL as explained above.
4 Tier - The Browser to the web server uses HTTP\HTML, the Web server to the App Server uses JOLT, and the App Server to the Database uses SQL.
SSL would be applied at any part you would need to secure outside your firewall.
Monday, August 25, 2008
How to run the VERSION AE and SETSPACE.SQR process for populating Tablespaces in App designer
1. To run the VERSION AE program for Oracle on your database.
(It is found in PS_HOME\bin\client\winx86.)
From the DOS command line, the syntax is:
psae -CD -CT ORACLE -CO -CP -R INSTALL -AI VERSION
2. The SETSPACE SQR identifies the tables with an invalid database name/Tablespace combination.
This step populates all Tablespace information in the PSRECTBLSPC table.
The values stored in the DDLSPACENAME field are updated with current values found in the system catalog for tables already defined in your database. If you modified Tablespace names from the PeopleSoft-delivered names, this step makes those same changes in the PeopleSoft record definition.
If you receive any errors when you run this script, correct them by creating the needed Tablespace or changing the Tablespace definition on the record object. Then run the script again to validate that you have created all Tablespaces.
A.To run setspace.sqr in windows
open sqrw(It is found in PS_HOME\bin\client\winx86.), pass dbname, username, password and in argument section pass the following argument assuming d:\pt847 is your PS_HOME
-Id:\pt847\sqr\
-ZIFd:\pt847\sqr\pssqr.ini
B.On unix use the below
Export PS_HOME=/u02/app/PT847
Export REPNAME=/u02/app/PT847/sqr/dddaudit.sqr
Export DB=sysadm/passw0rd@HRDEMO
Export SQR=$PS_HOME/bin/sqr/ORA/bin/sqr
$SQR $REPNAME $DB -I$PS_HOME/sqr/ -F/tmp/ -ZIF$PS_HOME/sqr/pssqr.ini
SQR for PeopleSoft V8.47
Database Name (Optional, Press ENTER to continue): HRDEMO
Process Instance (Optional, Press ENTER to continue): 2
Operator ID (Optional, Press ENTER to continue): PS
Run Control (Optional, Press ENTER to continue): r2
SQR for PeopleSoft: End of Run.
[/u02/app/PT847/bin/sqr/ORA/bin]
The output of this file will be in /tmp folder coz we have given -F/tmp/, so there in /tmp it will create a lis file ex:dddaudit.lis
(It is found in PS_HOME\bin\client\winx86.)
From the DOS command line, the syntax is:
psae -CD
2. The SETSPACE SQR identifies the tables with an invalid database name/Tablespace combination.
This step populates all Tablespace information in the PSRECTBLSPC table.
The values stored in the DDLSPACENAME field are updated with current values found in the system catalog for tables already defined in your database. If you modified Tablespace names from the PeopleSoft-delivered names, this step makes those same changes in the PeopleSoft record definition.
If you receive any errors when you run this script, correct them by creating the needed Tablespace or changing the Tablespace definition on the record object. Then run the script again to validate that you have created all Tablespaces.
A.To run setspace.sqr in windows
open sqrw(It is found in PS_HOME\bin\client\winx86.), pass dbname, username, password and in argument section pass the following argument assuming d:\pt847 is your PS_HOME
-Id:\pt847\sqr\
-ZIFd:\pt847\sqr\pssqr.ini
B.On unix use the below
Export PS_HOME=/u02/app/PT847
Export REPNAME=/u02/app/PT847/sqr/dddaudit.sqr
Export DB=sysadm/passw0rd@HRDEMO
Export SQR=$PS_HOME/bin/sqr/ORA/bin/sqr
$SQR $REPNAME $DB -I$PS_HOME/sqr/ -F/tmp/ -ZIF$PS_HOME/sqr/pssqr.ini
SQR for PeopleSoft V8.47
Database Name (Optional, Press ENTER to continue): HRDEMO
Process Instance (Optional, Press ENTER to continue): 2
Operator ID (Optional, Press ENTER to continue): PS
Run Control (Optional, Press ENTER to continue): r2
SQR for PeopleSoft: End of Run.
[/u02/app/PT847/bin/sqr/ORA/bin]
The output of this file will be in /tmp folder coz we have given -F/tmp/, so there in /tmp it will create a lis file ex:dddaudit.lis
Sunday, August 17, 2008
Working with CRONTAB
What is Crontab?
cron is a unix, solaris utility that allows tasks to be automatically run in the background at regular intervals by the cron daemon. These tasks are often termed as cron jobs in unix , solaris.
Crontab (CRON TABLE) is a file which contains the schedule of cron entries to be run and at specified times.
Crontab Restrictions
You can execute crontab if your name appears in the file /usr/lib/cron/cron.allow. If that file does not exist, you can use crontab if your name does not appear in the file /usr/lib/cron/cron.deny.
If only cron.deny exists and is empty, all users can use crontab. If neither file exists, only the root user can use crontab. The allow/deny files consist of one user name per line.
Crontab Commands
export EDITOR=vi ;to specify a editor to open crontab file.
crontab -e Edit your crontab file, or create one if it doesn't already exist.
crontab -l Display your crontab file.
crontab -r Remove your crontab file.
crontab -v Display the last time you edited your crontab file. (This only available on few systems.)
If you are super user, you can delete any user's crontab file with:
Crontab -d username
Crontab syntax
* * * * * command to be executed
- - - - -
| | | | |
| | | | +----- day of week (0 - 6) (Sunday=0)
| | | +------- month (1 - 12)
| | +--------- day of month (1 - 31)
| +----------- hour (0 - 23)
+------------- min (0 - 59)
* in the value field above means all legal values as in braces for that column.
The value column can have a * or a list of elements separated by commas. An element is either a number in the ranges shown above or two numbers in the range separated by a hyphen (meaning an inclusive range).
Note: The specification of days can be made in two fields: month day and weekday. If both are specified in an entry, they are cumulative meaning both of the entries will get executed .
Here is an example crontab file with two entries:
# minute (0-59),
# hour (0-23),
# day of the month (1-31),
# month of the year (1-12),
# day of the week (0-6, 0=Sunday)
# command
12 4 * * * /usr/local/bin/backup
5 3 10-15 4 * echo "taxes due" | mail jones
Disable Email
By default cron jobs sends a email to the user account executing the cronjob. If this is not needed put the following command At the end of the cron job line
Generate log file
To collect the cron execution execution log in a file :
30 18 * * * rm /home/someuser/tmp/* > /home/someuser/cronlogs/clean_tmp_dir.log
The user's interface to the crontab and at commands is very similar across different versions on UNIX, but implementations of underlying directory structures, daemons, and access controls may differ. Be sure to review your system documentation to take advantage of all aspects of these powerful commands.
There's practically no limit to the use of crontab and at, but a few words of warning. First, consider security issues when enabling user crontab and at permissions. Obviously, a disgruntled co-worker could leave a ``time-bomb'' of some sort, limited only by their other permission restrictions. Many versions of crontab and at allow you to specify ``allow'' and ``deny'' files to control which users have access to the utilities. You could also use root's crontab to check for and remove user crontabs (or any other files) if you want to.
Also, debug your crontab file entries thoroughly. Check that they are working. These entries are usually scheduled to execute at times of low-usage so it is unlikely you'll be around to observe them at the time.
Saturday, August 16, 2008
Performance Monitor Setup
Please note that the steps provided are for Self monitoring system (mainly for testing purposes). But for real production, you also need to implement the PTSYS database.
Step 1. Standard PIA Web Server install.
Step 2. For Application Server, select (10) 'Perf Collator' in the app server configuration via psadmin and boot.
The Perf Collator should be set to Yes in the appserver config option# 10:
10) Perf Collator
Step 3. Go to PeopleTools -> Performance Monitor -> Administration
Global Administration
Enter PPMI URL = http:///ppmi// (eg: http://ruby.peoplesoft.com/ppmi/ps/)
Enter PPMI User ID* = QEDMO or VP1 or PS.
Specify Monitor
Enter URL = http:///monitor// (eg: http://ruby.peoplesoft.com/monitor/ps/)
Step 4. Go to PeopleTools -> Integration Broker -> Gateways
Enter URL = http:///PSIGW/PeopleSoftListeningConnector
Save, Load, Save.
Step 5. Check Performance Monitor -> System Monitor -> System Performance
NOTE: As to setup the monitoring vs monitored systems and if you have web servers running on both of these systems, below is what you need to configure.
A. Login to your monitoring system.
Go to People Tools -> Performance Monitor -> Administration
Global Administration
Enter PPMI URL = http:///ppmi// (eg: http://ruby.peoplesoft.com/ppmi/ps/)
Enter PPMI User ID* = QEDMO or VP1 or PS.
Specify Monitor
Enter URL = NONE
B. Login to your monitored system.
Go to People Tools -> Performance Monitor -> Administration
Global Administration
Enter PPMI URL = NONE
Enter PPMI User ID = Leave it as blank. Otherwise, insert any user id if the system forces you to put a value in there.
Specify Monitor
Enter URL = http:///monitor// (eg:http://ruby.peoplesoft.com/monitor/ps/)
* Note:
Security list that PPMI User ID should have:
a) People Tools Perfmon Client role
b) Assign PTPMCLNT permission list to People Tools Perfmon Client role.
i. PTPMCLNT permission list should have Performance Monitor PPMI Access checked in the People Tools tab.
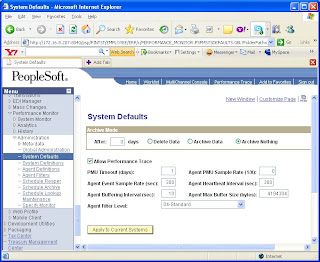
The Web Profile configuration (People Tools >Web Profile Configuration) like DEV need to have Enable PPM Agent checked in the General tab.
Note: The default Agent Filter Level is 01-Standby. Be sure to set it to 04-Standard,if you want every agent to start collecting performance data immediately after registration.
Step 1. Standard PIA Web Server install.
Step 2. For Application Server, select (10) 'Perf Collator' in the app server configuration via psadmin and boot.
The Perf Collator should be set to Yes in the appserver config option# 10:
10) Perf Collator
Step 3. Go to PeopleTools -> Performance Monitor -> Administration
Global Administration
Enter PPMI URL = http://
Enter PPMI User ID* = QEDMO or VP1 or PS.
Specify Monitor
Enter URL = http://
Step 4. Go to PeopleTools -> Integration Broker -> Gateways
Enter URL = http://
Save, Load, Save.
Step 5. Check Performance Monitor -> System Monitor -> System Performance
NOTE: As to setup the monitoring vs monitored systems and if you have web servers running on both of these systems, below is what you need to configure.
A. Login to your monitoring system.
Go to People Tools -> Performance Monitor -> Administration
Global Administration
Enter PPMI URL = http://
Enter PPMI User ID* = QEDMO or VP1 or PS.
Specify Monitor
Enter URL = NONE
B. Login to your monitored system.
Go to People Tools -> Performance Monitor -> Administration
Global Administration
Enter PPMI URL = NONE
Enter PPMI User ID = Leave it as blank. Otherwise, insert any user id if the system forces you to put a value in there.
Specify Monitor
Enter URL = http://
* Note:
Security list that PPMI User ID should have:
a) People Tools Perfmon Client role
b) Assign PTPMCLNT permission list to People Tools Perfmon Client role.
i. PTPMCLNT permission list should have Performance Monitor PPMI Access checked in the People Tools tab.
The Web Profile configuration (People Tools >Web Profile Configuration) like DEV need to have Enable PPM Agent checked in the General tab.
Note: The default Agent Filter Level is 01-Standby. Be sure to set it to 04-Standard,if you want every agent to start collecting performance data immediately after registration.

How to set Peoplesoft Trace from PIA ?
For AE, Open the Process Definition under PeopleTools, Process Scheduler.
Go to the override tab, and on the Parameter list line select Append from the dropdown, and in the edit box next to it, you can use the desired combination of traces, they all are;
Parameter List Append -TRACE 7 -TOOLSTRACEPC 3596 -TOOLSTRACESQL 31
Save the Defnition and hence forth this program will be traced each time it is run, until this is removed.
Using Both the -TOOLSTRACEPC & -TOOLSTRACESQL together should only be done when required, as the output from both go into the same file, making it very large and difficult to read. For normal program tracing using just the;
-TRACE 7 -TOOLSTRACEPC 3596
Give the Application Engine Trace, which traces the SQL in an AE program, and the PeopleSoft Trace, which is the pcode trace.
The above settings have equivelent settings in psprcs.cfg, they are;
TraceAE= -TRACE output goes into Application Engine Trace (.AET)
TracePC= -TOOLSTRACEPC output goes into the PeopleTools trace file (.trc)
TraceSQL= -TOOLSTRACESQL output ALSO goes into the PeopleTools trace file(.trc)
Again, depending on what the program is doing, most commnoly we'd use the
-TRACE & -TOOLSTRACEPC together. The only time I use the -TOOLSTRACESQL is
when we're looking for a problem with the psae program itself.
For COBOL the idea is similar, we won't be appending to the parameter list instead we'll be overriding it. So first step is to open the appropriate Process Type Definition, example;
Process Type defn COBOL NT/Win2000 ORACLE
Copy the whole parameter list line into you mouse clipboard;
%%PRCSNAME%%
%UTYPE%%/%UNAME%%/%%OPRID%%/%%OPRPSWD%%/%%RUNCNTLID%%/%%INSTANCE%%//
%UFLAG%%
Then open the Process Definition for the particular COBOL Process, go to the Override Tab, and on the Parameter list line, select Override from the drop down. Then in the Parameter Edit box, paste the whole parameter list from the Process Defn we just got;
%%PRCSNAME%%
%UTYPE%%/%UNAME%%/%%OPRID%%/%%OPRPSWD%%/%%RUNCNTLID%%/%%INSTANCE%%//
%UFLAG%%
Notice at the end of the line after the %%INSTANCE%% and before the %UFLAGS%% there are 2 // We need to insert the desired bit map number inbetween the slashes. Choose the bitmap number you want to use for the trace, and put it between the slashes like so;
%UTYPE%%/%UNAME%%/%%OPRID%%/%%OPRPSWD%%/%%RUNCNTLID%%/%%INSTANCE%%/2
55/%UFLAG%%
Save the Process Definition and once you launch the COBOL or AE program you can go to the Process Monitor, Details, Parameter List, and see the expanded command line and you'll see your trace value inserted;
Command Line:
PSRUN PTPDBTST ORACLE/E840D20P/VP1/%OPRPSWD%/1/475/255/UFLAG%
With both the AE & Cobol traces done like this once this is done, every time the program runs it will be traced. Need to undo all of this setting the override back to None in both Definitions will turn it off.
Monday, August 11, 2008
Some Usful SQL
Query to get the processing time
select
PRCSINSTANCE,
PRCSNAME,
OPRID,
RUNSTATUSDESCR,
decode (FLOOR(TO_CHAR((enddttm-begindttm)*24*60))||':'||lpad(FLOOR(((TO_CHAR((enddttm-begindttm)*24*60))- floor(TO_CHAR((enddttm-begindttm)*24*60)))*60) ,2,0), ':',' ',FLOOR(TO_CHAR((enddttm- begindttm)*24*60))||':'||lpad(FLOOR(((TO_CHAR((enddttm-begindttm)*24*60))-floor(TO_CHAR((enddttm-begindttm)*24*60)))*60) ,2,0)) AS MINSEC
FROM PS_PMN_PRCSLIST
where runstatusdescr ='Success';
How to know The Value corresponding to a Process Run Status?
SELECT XLATLONGNAME, FIELDVALUE FROM PSXLATITEM WHERE FIELDNAME = 'RUNSTATUS';
How to find the permission lists associated to a user?
SELECT A.OPRID, D.ROLEUSER, B.ROLENAME, B.CLASSID, C.ClASSDEFNDESC
FROM PSOPRDEFN A, PSROLECLASS B, PSCLASSDEFN C, PSROLEUSER D
WHERE A.OPRID=D.ROLEUSER AND B.CLASSID=C.CLASSID AND B.ROLENAME=D.ROLENAME AND A.OPRID= 'deep'
ORDER BY B.CLASSID;
• The process scheduler has a job in posting status for a long time
Some time by someone posting a very large file –
We can check with following Query:
All process names that have file size over 1Mb, and have not gone to "success" status -- yet
SELECT C.OPRID,D.OPRDEFNDESC,A.PRCSINSTANCE, B.PRCSNAME, A.FILE_SIZE, B.DISTSTATUS,C.RUNSTATUS
FROM PS_CDM_FILE_LIST A, PS_CDM_LIST B, PSPRCSRQST C,PSOPRDEFN D
WHERE A.DTTM_CREATED > SYSDATE - 1
AND A. FILE_SIZE > 1048576
AND A.PRCSINSTANCE = B.PRCSINSTANCE
AND B.PRCSINSTANCE = C.PRCSINSTANCE
AND B.DISTSTATUS = '7'
AND RUNSTATUS = '14'
ORDER BY PRCSINSTANCE DESC, DTTM_CREATED DESC, FILE_SIZE DESC;
Once the prcsinstance is determined, use that to find the file in the log_output directory and user know they posted a file that was too large.
some time distribution agent processes not cleaning up after themselves
Kill all distribution agent processes (kill –9) and jobs are still posting, try updating the tables to get them to post
if noting happening bounce the scheduler and use ipcrmall (Peoplesoft delivers a script (it's stored in appserv directory):ipcrmall.sh)
[//home/oracle]cd $PS_HOME/appserv
[/product/psoft/appserv]ls -l | grep ipcrmall.sh -rwxr-xr-x 1 oracle dba 6281 Apr 18 2006 ipcrmall.sh
[/product/psoft/appserv]
to clear all memory segments
The process scheduler has processes in queued status PSPRCSRV process is hung up, kill it and it will restart Or, bounce the process scheduler
Peoplesoft Installation Steps
1: Install Oracle 8i/9i
1.1. File Locations:
1.1.1. Source – Path : Enter the path from where we are installing i.e., Backup or the Cd-Drive. If you have the oracle backup in “j:\oracle” folder then we give the path as “j:\oracle”.
1.1.2. Destination – Name: Leave it as default.
1.1.3. Destination – Path: Mention the path where oracle is to be installed. For example, if we want to install Oracle in “c:”
then change the drive in default path “c:” and keep the folders as default.
1.2. Available products: Select “Oracle 9i Database 9.2.0.1.0”.
1.3. Installation Types: Select “Enterprise Edition”.
1.4. Database Configuration: Select “General Purpose”.
1.5. Keep the port number as default which is shown.
1.6. Database Identification: Give the name of the database that is to be created, for example if we want to create a database named “ORDEMO” then specify it in both Global Database Name and SID.
Note: While giving the Database name itself we can see the same in SID.
1.7. Database File Location: Here we can see some default value in “Directory for
Database Files”, just check the path and assign it to the drive where oracle is
Installed i.e., if oracle is installed in “d:” then check the drive if it is “d:” then
go to next screen else change it to “d:”
1.8. Database Character Set: We can select any option i.e. “Default Character Set”
or “Unicode Character Set”. Select “Unicode Character Set”.
1.9. Click Install.
1.10. We will get a screen in the process named “Database Configuration
Assistant” give the SYS’s and SYSTEM’s password and then click “OK”.
1.11. Oracle will be installed.
1.12. We will see a screen opened named “Oracle HTTP Server”, we go to
“Start>Programs>Oracle-OraHome92>Oracle HTTP Server>Stop
HTTP Server Powered by Apache” to stop the service.
1.13. This completes Oracle installation.
2. PeopleSoft Tools Installation.
2.1. Click the “setup.exe” file where "PeopleSoft Tools” Backup/Cds available.
2.2. Click “I agree”.
2.3. Give serial key as “XXXXXXXXXXXXXXXXXXXXXXX”.
2.4. Click the Database character set that is selected for Oracle. (1.8).
2.5. See that all the check boxes are checked (marked).
2.6. Give the path where PeopleSoft Tools to be installed. For example, if we want to install in “g:\pst” then give the path as “g:\pst”. We can also leave it as default.
2.7. Enterprise Resource Planning Connectors: Check “NO”.
2.8. Connectivity Program Directory: Leave it as default.
2.9. Click “YES” for installing PeopleSoft Icons.
2.10. Keep every screen as default to complete the installation.
2.11. Click “Finish” to complete the installation.
3. Installing EPM 8.9. (Enterprise Performance management)
3.1. Click the “setup.exe” file where "EPM” Backup/Cds available.
3.2. Click “I Agree the License Agreement”.
3.3. Give key as “XXXXXXXXXXXXXXXXXXXXXXXXXX”.
3.4. Click the Database character set that is selected for Oracle. (1.8).
3.5. See that all the check boxes are checked (marked).
3.6. We can leave it as default or we can even change it, for example, we can specify as “D:\Ps” Here “Ps” is the folder where we installed PeopleSoft Tools.
Note: EPM must be installed in PeopleSoft Tools folder only.
3.7. Click “Next” to all screens.
3.8. Click “Finish” to complete the installation.
4: Run SQL Scripts
We can see these scripts in the path "\folder..." we install PeopleSoft
Tools. For example, if we install PeopleSoft Tools in "D:" and in the
folder mentioned as 'PSTools' then we can find scripts at
"D:\PSTools\scripts\nt".
4a) Create a Folder by name "Log" (This will be useful for further reference,
All the script files with commands will be stored in this folder)
For Example if you are creating it in’d’ drive, then specify "d:\Log" this in every script at Spool statement.
Modify and Run only these files in the SAME ORDER in SQL PLUS either from dos prompt or from the SQL,
*** Rem: Always run these scripts when connected as SYSDBA or as SYSTEM(it is must).
1) Utlspace.sql
4.1.1. Give Log path to Spool. (4a).
4.1.2. "@%ORACLE_HOME%\rdbms\admin\catalog.sql" use REM
as the Prefix to all statements of this type, this can be
modified and seen as “REM@%ORACLE_HOME%\rdbms\admin\catalog.sql"
4.1.3. Specify the path where the oracle database (SID) is present
in place of ":\oradata\\" i.e., If we have
installed oracle in " 'd' drive, 'oracle' folder and with
database (SID) as 'EPMDEMO' " then we have to give as
"d:\oracle\oradata\EPMDEMO\". 'oradata' need not be
changed (this is the folder where the database will be created).
2) DbOwner.sql
4.2.1. Give Log path to Spool. (4a).
4.2.2. Modify this statement by adding the database name at the end
of it. i.e., If the Database (SID) in oracle is created as
'DATAORA' then, "CONNECT PS/PS" is modified as
"CONNECT PS/PS@DATAORA"
4.2.3. This "CONNECT SYSTEM/MANAGER" should be changed to
"CONNECT SYSTEM/@ "
the App. Password and Database Name should be the
same as what we have given/created in Oracle.
For example, in oracle if we give the system password as "oraclesys" and the Database (SID) as "ODATA" then we give "CONNECT SYSTEM/oraclesys@ODATA".
3) PFDDL.sql
4.3.1. Give Log path to Spool. (4a).
4.3.2. Specify the path where the oracle database (SID) is present
in place of ":\oradata\\" i.e., If we have
installed oracle in " 'd' drive, 'oracle' folder and with
database (SID) as 'EPMDEMO' " then we have to give as
"d:\oracle\oradata\EPMDEMO\". 'oradata' need not be changed (this is the folder where the database will be created).
4.3.3. Replace all "REMARK ALTER" statements with "ALTER".
4) Psroles.sql
4.4.1. Give Log path to Spool. (4a).
5) Psadmin.sql
4.5.1. Give Log path to Spool. (4a).
4.5.2. In the place of "&ADMIN" give "SYSADM" and In place of
"&PASSWORD" give "SYSADM" and In place of
"&TSPACE" give "PSDEFAULT"(wherever we find in this
script).
Note: Even though if it asks for input details of Username, Password and table name then we give as
Enter name of PeopleSoft Owner ID: SYSADM
Enter PeopleSoft Owner ID password: SYSADM
Enter desired default table space: PSDEFAULT
4.5.3. This "CONNECT SYSTEM/MANAGER" should be changed to
"CONNECT SYSTEM/@ "
The App. Password and Database Name should be same as
what we have given/created in Oracle.
For example, In oracle if we give the system password as
"oraclesys" and the Database (SID) as "ODATA" then we
give "CONNECT SYSTEM/oraclesys@ODATA ".
4.5.4. "@%ORACLE_HOME%\rdbms\admin\catalog.sql" use REM
as the Prefix to all statements of this type, this can be
modified and seen as
"REM @%ORACLE_HOME%\rdbms\admin\catalog.sql"
6) Connect.sql
4.6.1. Give Log path to Spool. (4a).
5: Now go to Start->Programs->PeopleTools 8.46->Configuration Manager
Configuration Manager 8.46
Database Type: Oracle
Database Name: ODB
User Id: VP1 (VP [one])
Connect Id: people
Connect Password peop1e (peep [one] e)
Connect Password [confirm] peop1e (peop [one] e)
*** Here "ODB” is the Database Name that we have given/created in Oracle.
6: Go to Start->Programs->PeopleTools 8.46->Data Mover
PeopleSoft Signon
Connection Type Oracle
Database Name DATAB
User ID SYSADM
Password SYSADM
*** Here “DATAB” is the Database Created/given in Oracle.
6.1. Go to File Database Setup
Database Setup
Select Target Database Oracle (default)
Database Type Non-Unicode/Unicode
*** Here Database Type is selected based on the Oracle Database
For Example, if we select Unicode in Oracle then we have to select the same here.
Click Next
6.2. Database Setup – Select PeopleSoft Application
6.2.1. Click Database Type as “Demo”.
6.2.2. In PeopleSoft Application we find “PeopleSoft EPM Database – US
English”, Click Add
6.2.3. We can see “PeopleSoft EPM Database – US English” in Data
Mover Scripts to Create box.
Click Next
6.3. Database Setup – Database Parameters
Database Name PSOFT
Symbolic ID PSOFT
Access ID SYSADM
Access Password SYSADM
Connect ID PEOPLE/people
*** Here “PSOFT” is the Database Created/given in Oracle.
*** Here Database Name and Symbolic ID is given the same.
Click Finish
7: Create another folder, for example, create a folder named “dmlog” in “e:” or we can
use the same log folder used for scripts in (4a) then we have to give the path as “e:\dmlog\”
In Data Mover, some scripts will be generated
7.1. Replace “c:\docume~1\user\locals~1\temp\” with the log folder
created (7).
7.2. Go to File -> Run Script
7.3. Some log files are generated in the folder mentioned (7.1).
Look for successful completion in the following log files
i. epengs.log
ii. epengl.log
iii. encrypt.log
iv. triggers.log
v. views.log (Errors are acceptable)
vi. temptbls.log
Note: The scripts will stop running when it comes to views.log with some errors giving the message “Unsuccessful Completion”, save this and Then we have to open a new Data Mover window and copy the last statements in the scripts in the saved file which is related to Temp Tables i.e.,
REM - CREATE TEMP TABLES
/
SET LOG d:\epmdemolog\log\temptbls.log;
CREATE_TEMP_TABLE *;
Again run these scripts (This is not compulsory/necessary).
8: Install BEAWeblogic
8.1. Click the “setup.exe” file where “BEA WebLogic” Backup/Cds available.
8.2. Check “Yes” to Agree the terms of license.
8.3. Specify the directory/path where BEA is to be installed. For example we
have to install in "f:" drive then the path in the screen should be "f:\bea".
8.4. Check Install Type as "Complete".
8.5. Leave the product directory as default and click "Next".
8.6. Click "Done" button to complete the installation process.
8.4. From the source of the BEA i.e., Backup Dump/Software CD copy all the
files from the license folder to the folder where we install this BEA
Weblogic.
For example, if we install BEA Weblogic in “d:\bea" then we have to go to source if cd drive is “x” then go to “x:\ weblogic8.1\license” and copy all the files from this path to “d:\bea” where the BEA Weblogic is installed.
8.5. In command prompt, go to folder where you have your weblogic
installation files and do the following
For example, if we install BEA Weblogic in “d:\bea" then we have to go to command prompt and type
“d:\bea>InstallPSLicense.cmd d:\bea”
***NOTE: The steps 8.6 and 8.7 are not necessary.
8.6. To install Service go to command prompt and do following
i. cd c:\bea\wlserver6.1\config\mydomain\setenv.cmd
ii. e:\wls61sp2_upgrade_win.exe
8.7. To check if weblogic installed properly
i. Go to http://localhost:7001 ( web server index page)
9: Install Tuxedo\Jolt
9.1. Click the “pstuxinstall.exe” file where “Tuxedo” Backup/Cds available.
9.2. BEA Home being defaulted to "C:\bea" [y]: -- Give the path where
BEA Home is installed, for example, if BEA Home is installed in "g:\bea"
then we give 'n' in this statement and give the path in the next statement.
9.3. Tuxedo 8.1 will be installed to "C:\bea\Tuxedo8.1"? [y]: y
Here path will be shown (9.2) and we give "y".
9.4. TListen port being defaulted to 3050? [y]: y (default).
9.5. Accept default TListen password 'password'? [y]: y.
9.6. Are you happy with your selections? [y]: y.
9.7. Now Tuxedo 8.1 will be installed on your system...
9.8. Press any key to Finish the installation.
Note: We have to Restart the system after installing Tuxedo\Jolt.
10: Configuring Application Server
10.1. Go to the folder where we have installed PeopleSoft Tools, Suppose that we
installed in “e:\psof”.
10.2. Go to “e:\psof\appserv” and we can see a file named “psadmin.exe”.
10.3. Double click (Run) “psadmin.exe” file.
10.3.1. PeopleSoft Server Administration
i. 1 (Application Server)
ii. 2 (Create domain, give domain name same as Database Name
mentioned in Oracle, Ex: DBASE)
iii. 3 (Medium)
iv. Would you like to configure this domain now? [y]: y
v. Quick-configure menu – domain: DBASE
vi. Make the following changes in the settings
15. UserId: VP1 (VP [one])
16. UserPswd: VP1 (VP [one])
18. Oracle path: c:\oracle\ora81\bin (leave it default after
checking the path of the directory “bin” in the folders where
Oracle is installed.
22. WSL Port: 7000(default, change it to any number like 70xx,
Ex: 7011, 7025, 7033…)
23. JSL Port: 9000(default, change it to any number like 90xx,
Ex: 9011, 9025, 9033…)
10.3.2. 11. Load this Domain
10.3.3. 1. Boot this Domain
10.3.4. After booting, we should get messages as “14 Processes Started”.
10.4. Press "q" in all the menus to close the window.
***** 10.5. We can also keep the window minimized.
11: Configuring Web Server
11.1. Go to the folder where we have installed PeopleSoft Tools, Suppose that we
installed in “d:\pplsft”.
11.2. Go to “d:\pplsft\ setup\mpinternet” and we can see a file named “setup.exe”.
11.3. Double click (Run) “setup.exe” file.
11.3.1. Give the path where we have installed Peoplesoft here “d:\pplsft”;
Here it will show the correct path by default (Just check the path).
11.3.2. Select “BEA WebLogic Server”
11.3.3. Give the path where we have installed BEA WebLogic, if we
install it in “e:\beawl” then give path as “e:\beawl”.
11.3.4. Give the database name created in oracle as the domain name.
For Example, if we create “DATAB” database in oracle we specify
it here.
11.3.5. Select all the check boxes in the next screen i.e., “Please select the
application packages to deploy”.
11.3.6. Select “Single Server Domain” in the next screen where it asks for
the “Configuration to install”.
11.3.7. Keep the website name as default which will be shown as “ps”.
(We can also change it).
11.3.8. Port Numbers and Summaries
AppServer Name: comp1 (default)
JSL Port: 90xx
HTTP Port: 80xx
HTTPS Port: 443
Authentication Token Domain (Optional): (leave it blank)
Note: JSL Port: 9000(default, change it to any number like 90xx, Ex: 9011, 9025…
Note: HTTP Port: 80(default, change it to any number like 80xx, Ex: 8011, 8025…
11.3.9. Keep the next screen default values Web Profile Name, User ID,
Password
11.3.10. Repository location can be default (Can also be changed).
11.3.11. Click “Install”
12. After completing the Installation
12.1. Go to the folder where PeopleSoft is installed suppose that “D:\psoft” and
go to the folder “D:\psoft\webserv\EPMDEMO” there we will find
"startPIA.cmd", Double click it wait, until it displays “started PIA in
production mode”.
12.2. If 10.4 is followed we have to follow these steps else not required, i.e., if
appserver window is closed we have to follow these steps.
Go to “D:\psoft\appserv”and click "psadmin.cmd" and follow the steps
12.2.1. 1(application server)
12.2.2. 1 (Administer domain)
12.2.3. 1(domain i.e., Oracle Database Name)
12.2.4. 1(Boot this domain)
12.2.5. Wait until the message “14 processes are started” is displayed
13. After it gets started
Go to internet browser and enter
http://localhost :( HTTP port number)/psp/ps/? Cmd=login (11.3.8)
Enter Username : VP1
Password : VP1 (VP [one]).
1.1. File Locations:
1.1.1. Source – Path : Enter the path from where we are installing i.e., Backup or the Cd-Drive. If you have the oracle backup in “j:\oracle” folder then we give the path as “j:\oracle”.
1.1.2. Destination – Name: Leave it as default.
1.1.3. Destination – Path: Mention the path where oracle is to be installed. For example, if we want to install Oracle in “c:”
then change the drive in default path “c:” and keep the folders as default.
1.2. Available products: Select “Oracle 9i Database 9.2.0.1.0”.
1.3. Installation Types: Select “Enterprise Edition”.
1.4. Database Configuration: Select “General Purpose”.
1.5. Keep the port number as default which is shown.
1.6. Database Identification: Give the name of the database that is to be created, for example if we want to create a database named “ORDEMO” then specify it in both Global Database Name and SID.
Note: While giving the Database name itself we can see the same in SID.
1.7. Database File Location: Here we can see some default value in “Directory for
Database Files”, just check the path and assign it to the drive where oracle is
Installed i.e., if oracle is installed in “d:” then check the drive if it is “d:” then
go to next screen else change it to “d:”
1.8. Database Character Set: We can select any option i.e. “Default Character Set”
or “Unicode Character Set”. Select “Unicode Character Set”.
1.9. Click Install.
1.10. We will get a screen in the process named “Database Configuration
Assistant” give the SYS’s and SYSTEM’s password and then click “OK”.
1.11. Oracle will be installed.
1.12. We will see a screen opened named “Oracle HTTP Server”, we go to
“Start>Programs>Oracle-OraHome92>Oracle HTTP Server>Stop
HTTP Server Powered by Apache” to stop the service.
1.13. This completes Oracle installation.
2. PeopleSoft Tools Installation.
2.1. Click the “setup.exe” file where "PeopleSoft Tools” Backup/Cds available.
2.2. Click “I agree”.
2.3. Give serial key as “XXXXXXXXXXXXXXXXXXXXXXX”.
2.4. Click the Database character set that is selected for Oracle. (1.8).
2.5. See that all the check boxes are checked (marked).
2.6. Give the path where PeopleSoft Tools to be installed. For example, if we want to install in “g:\pst” then give the path as “g:\pst”. We can also leave it as default.
2.7. Enterprise Resource Planning Connectors: Check “NO”.
2.8. Connectivity Program Directory: Leave it as default.
2.9. Click “YES” for installing PeopleSoft Icons.
2.10. Keep every screen as default to complete the installation.
2.11. Click “Finish” to complete the installation.
3. Installing EPM 8.9. (Enterprise Performance management)
3.1. Click the “setup.exe” file where "EPM” Backup/Cds available.
3.2. Click “I Agree the License Agreement”.
3.3. Give key as “XXXXXXXXXXXXXXXXXXXXXXXXXX”.
3.4. Click the Database character set that is selected for Oracle. (1.8).
3.5. See that all the check boxes are checked (marked).
3.6. We can leave it as default or we can even change it, for example, we can specify as “D:\Ps” Here “Ps” is the folder where we installed PeopleSoft Tools.
Note: EPM must be installed in PeopleSoft Tools folder only.
3.7. Click “Next” to all screens.
3.8. Click “Finish” to complete the installation.
4: Run SQL Scripts
We can see these scripts in the path "
Tools. For example, if we install PeopleSoft Tools in "D:" and in the
folder mentioned as 'PSTools' then we can find scripts at
"D:\PSTools\scripts\nt".
4a) Create a Folder by name "Log" (This will be useful for further reference,
All the script files with commands will be stored in this folder)
For Example if you are creating it in’d’ drive, then specify "d:\Log" this in every script at Spool statement.
Modify and Run only these files in the SAME ORDER in SQL PLUS either from dos prompt or from the SQL,
*** Rem: Always run these scripts when connected as SYSDBA or as SYSTEM(it is must).
1) Utlspace.sql
4.1.1. Give Log path to Spool. (4a).
4.1.2. "@%ORACLE_HOME%\rdbms\admin\catalog.sql" use REM
as the Prefix to all statements of this type, this can be
modified and seen as “REM@%ORACLE_HOME%\rdbms\admin\catalog.sql"
4.1.3. Specify the path where the oracle database (SID) is present
in place of "
installed oracle in " 'd' drive, 'oracle' folder and with
database (SID) as 'EPMDEMO' " then we have to give as
"d:\oracle\oradata\EPMDEMO\". 'oradata' need not be
changed (this is the folder where the database will be created).
2) DbOwner.sql
4.2.1. Give Log path to Spool. (4a).
4.2.2. Modify this statement by adding the database name at the end
of it. i.e., If the Database (SID) in oracle is created as
'DATAORA' then, "CONNECT PS/PS" is modified as
"CONNECT PS/PS@DATAORA"
4.2.3. This "CONNECT SYSTEM/MANAGER" should be changed to
"CONNECT SYSTEM/
the App. Password and Database Name should be the
same as what we have given/created in Oracle.
For example, in oracle if we give the system password as "oraclesys" and the Database (SID) as "ODATA" then we give "CONNECT SYSTEM/oraclesys@ODATA".
3) PFDDL.sql
4.3.1. Give Log path to Spool. (4a).
4.3.2. Specify the path where the oracle database (SID) is present
in place of "
installed oracle in " 'd' drive, 'oracle' folder and with
database (SID) as 'EPMDEMO' " then we have to give as
"d:\oracle\oradata\EPMDEMO\". 'oradata' need not be changed (this is the folder where the database will be created).
4.3.3. Replace all "REMARK ALTER" statements with "ALTER".
4) Psroles.sql
4.4.1. Give Log path to Spool. (4a).
5) Psadmin.sql
4.5.1. Give Log path to Spool. (4a).
4.5.2. In the place of "&ADMIN" give "SYSADM" and In place of
"&PASSWORD" give "SYSADM" and In place of
"&TSPACE" give "PSDEFAULT"(wherever we find in this
script).
Note: Even though if it asks for input details of Username, Password and table name then we give as
Enter name of PeopleSoft Owner ID: SYSADM
Enter PeopleSoft Owner ID password: SYSADM
Enter desired default table space: PSDEFAULT
4.5.3. This "CONNECT SYSTEM/MANAGER" should be changed to
"CONNECT SYSTEM/
The App. Password and Database Name should be same as
what we have given/created in Oracle.
For example, In oracle if we give the system password as
"oraclesys" and the Database (SID) as "ODATA" then we
give "CONNECT SYSTEM/oraclesys@ODATA ".
4.5.4. "@%ORACLE_HOME%\rdbms\admin\catalog.sql" use REM
as the Prefix to all statements of this type, this can be
modified and seen as
"REM @%ORACLE_HOME%\rdbms\admin\catalog.sql"
6) Connect.sql
4.6.1. Give Log path to Spool. (4a).
5: Now go to Start->Programs->PeopleTools 8.46->Configuration Manager
Configuration Manager 8.46
Database Type: Oracle
Database Name: ODB
User Id: VP1 (VP [one])
Connect Id: people
Connect Password peop1e (peep [one] e)
Connect Password [confirm] peop1e (peop [one] e)
*** Here "ODB” is the Database Name that we have given/created in Oracle.
6: Go to Start->Programs->PeopleTools 8.46->Data Mover
PeopleSoft Signon
Connection Type Oracle
Database Name DATAB
User ID SYSADM
Password SYSADM
*** Here “DATAB” is the Database Created/given in Oracle.
6.1. Go to File Database Setup
Database Setup
Select Target Database Oracle (default)
Database Type Non-Unicode/Unicode
*** Here Database Type is selected based on the Oracle Database
For Example, if we select Unicode in Oracle then we have to select the same here.
Click Next
6.2. Database Setup – Select PeopleSoft Application
6.2.1. Click Database Type as “Demo”.
6.2.2. In PeopleSoft Application we find “PeopleSoft EPM Database – US
English”, Click Add
6.2.3. We can see “PeopleSoft EPM Database – US English” in Data
Mover Scripts to Create box.
Click Next
6.3. Database Setup – Database Parameters
Database Name PSOFT
Symbolic ID PSOFT
Access ID SYSADM
Access Password SYSADM
Connect ID PEOPLE/people
*** Here “PSOFT” is the Database Created/given in Oracle.
*** Here Database Name and Symbolic ID is given the same.
Click Finish
7: Create another folder, for example, create a folder named “dmlog” in “e:” or we can
use the same log folder used for scripts in (4a) then we have to give the path as “e:\dmlog\”
In Data Mover, some scripts will be generated
7.1. Replace “c:\docume~1\user\locals~1\temp\” with the log folder
created (7).
7.2. Go to File -> Run Script
7.3. Some log files are generated in the folder mentioned (7.1).
Look for successful completion in the following log files
i. epengs.log
ii. epengl.log
iii. encrypt.log
iv. triggers.log
v. views.log (Errors are acceptable)
vi. temptbls.log
Note: The scripts will stop running when it comes to views.log with some errors giving the message “Unsuccessful Completion”, save this and Then we have to open a new Data Mover window and copy the last statements in the scripts in the saved file which is related to Temp Tables i.e.,
REM - CREATE TEMP TABLES
/
SET LOG d:\epmdemolog\log\temptbls.log;
CREATE_TEMP_TABLE *;
Again run these scripts (This is not compulsory/necessary).
8: Install BEAWeblogic
8.1. Click the “setup.exe” file where “BEA WebLogic” Backup/Cds available.
8.2. Check “Yes” to Agree the terms of license.
8.3. Specify the directory/path where BEA is to be installed. For example we
have to install in "f:" drive then the path in the screen should be "f:\bea".
8.4. Check Install Type as "Complete".
8.5. Leave the product directory as default and click "Next".
8.6. Click "Done" button to complete the installation process.
8.4. From the source of the BEA i.e., Backup Dump/Software CD copy all the
files from the license folder to the folder where we install this BEA
Weblogic.
For example, if we install BEA Weblogic in “d:\bea" then we have to go to source if cd drive is “x” then go to “x:\ weblogic8.1\license” and copy all the files from this path to “d:\bea” where the BEA Weblogic is installed.
8.5. In command prompt, go to folder where you have your weblogic
installation files and do the following
For example, if we install BEA Weblogic in “d:\bea" then we have to go to command prompt and type
“d:\bea>InstallPSLicense.cmd d:\bea”
***NOTE: The steps 8.6 and 8.7 are not necessary.
8.6. To install Service go to command prompt and do following
i. cd c:\bea\wlserver6.1\config\mydomain\setenv.cmd
ii. e:\wls61sp2_upgrade_win.exe
8.7. To check if weblogic installed properly
i. Go to http://localhost:7001 ( web server index page)
9: Install Tuxedo\Jolt
9.1. Click the “pstuxinstall.exe” file where “Tuxedo” Backup/Cds available.
9.2. BEA Home being defaulted to "C:\bea"
BEA Home is installed, for example, if BEA Home is installed in "g:\bea"
then we give 'n' in this statement and give the path in the next statement.
9.3. Tuxedo 8.1 will be installed to "C:\bea\Tuxedo8.1"
Here path will be shown (9.2) and we give "y".
9.4. TListen port being defaulted to 3050
9.5. Accept default TListen password 'password'
9.6. Are you happy with your selections
9.7. Now Tuxedo 8.1 will be installed on your system...
9.8. Press any key to Finish the installation.
Note: We have to Restart the system after installing Tuxedo\Jolt.
10: Configuring Application Server
10.1. Go to the folder where we have installed PeopleSoft Tools, Suppose that we
installed in “e:\psof”.
10.2. Go to “e:\psof\appserv” and we can see a file named “psadmin.exe”.
10.3. Double click (Run) “psadmin.exe” file.
10.3.1. PeopleSoft Server Administration
i. 1 (Application Server)
ii. 2 (Create domain, give domain name same as Database Name
mentioned in Oracle, Ex: DBASE)
iii. 3 (Medium)
iv. Would you like to configure this domain now?
v. Quick-configure menu – domain: DBASE
vi. Make the following changes in the settings
15. UserId: VP1 (VP [one])
16. UserPswd: VP1 (VP [one])
18. Oracle path: c:\oracle\ora81\bin (leave it default after
checking the path of the directory “bin” in the folders where
Oracle is installed.
22. WSL Port: 7000(default, change it to any number like 70xx,
Ex: 7011, 7025, 7033…)
23. JSL Port: 9000(default, change it to any number like 90xx,
Ex: 9011, 9025, 9033…)
10.3.2. 11. Load this Domain
10.3.3. 1. Boot this Domain
10.3.4. After booting, we should get messages as “14 Processes Started”.
10.4. Press "q" in all the menus to close the window.
***** 10.5. We can also keep the window minimized.
11: Configuring Web Server
11.1. Go to the folder where we have installed PeopleSoft Tools, Suppose that we
installed in “d:\pplsft”.
11.2. Go to “d:\pplsft\ setup\mpinternet” and we can see a file named “setup.exe”.
11.3. Double click (Run) “setup.exe” file.
11.3.1. Give the path where we have installed Peoplesoft here “d:\pplsft”;
Here it will show the correct path by default (Just check the path).
11.3.2. Select “BEA WebLogic Server”
11.3.3. Give the path where we have installed BEA WebLogic, if we
install it in “e:\beawl” then give path as “e:\beawl”.
11.3.4. Give the database name created in oracle as the domain name.
For Example, if we create “DATAB” database in oracle we specify
it here.
11.3.5. Select all the check boxes in the next screen i.e., “Please select the
application packages to deploy”.
11.3.6. Select “Single Server Domain” in the next screen where it asks for
the “Configuration to install”.
11.3.7. Keep the website name as default which will be shown as “ps”.
(We can also change it).
11.3.8. Port Numbers and Summaries
AppServer Name: comp1 (default)
JSL Port: 90xx
HTTP Port: 80xx
HTTPS Port: 443
Authentication Token Domain (Optional): (leave it blank)
Note: JSL Port: 9000(default, change it to any number like 90xx, Ex: 9011, 9025…
Note: HTTP Port: 80(default, change it to any number like 80xx, Ex: 8011, 8025…
11.3.9. Keep the next screen default values Web Profile Name, User ID,
Password
11.3.10. Repository location can be default (Can also be changed).
11.3.11. Click “Install”
12. After completing the Installation
12.1. Go to the folder where PeopleSoft is installed suppose that “D:\psoft” and
go to the folder “D:\psoft\webserv\EPMDEMO” there we will find
"startPIA.cmd", Double click it wait, until it displays “started PIA in
production mode”.
12.2. If 10.4 is followed we have to follow these steps else not required, i.e., if
appserver window is closed we have to follow these steps.
Go to “D:\psoft\appserv”and click "psadmin.cmd" and follow the steps
12.2.1. 1(application server)
12.2.2. 1 (Administer domain)
12.2.3. 1(domain i.e., Oracle Database Name)
12.2.4. 1(Boot this domain)
12.2.5. Wait until the message “14 processes are started” is displayed
13. After it gets started
Go to internet browser and enter
http://localhost :( HTTP port number)/psp/ps/? Cmd=login (11.3.8)
Enter Username : VP1
Password : VP1 (VP [one]).
Peoplesoft SMTP settings
To generate electronic mail messages then SMTP settings must be configured
for both the Application Server as well as the Process schedulers. These
Settings are configured through PSADMIN or through the PSAPPSRV.CFG and
PSPRCS.CFG files respectively.
Step 1:
;===============================================================
; Settings for SMTP mail
;===============================================================
SMTPServer=PSP-SMTP-01<---- name of your SMTP server (this can also be the
IP address of the SMTP server)
-------------------------------------------------------------------------------
SMTPPort=25 <---- port number for your server (usually will be 25)
SMTPServer1=PSP-SMTPG-01 <----- name of backup server (not necessary)
SMTPPort1=25 <---- backup server port number
SMTPSender=PeopleSoft@peoplesoft.com <----- Valid email ID format
SMTPSourceMachine=ts-hp03.peoplesoft.com <------.com (this can also be
the IP address of the machine without the.com) Note: This
needs to be the machine name of the server being configured, Application
or Process Scheduler, NOT THE NAME OF THE DATABASE YOU ARE CONNECTING TO.
Step 2: check the Emil check box

for both the Application Server as well as the Process schedulers. These
Settings are configured through PSADMIN or through the PSAPPSRV.CFG and
PSPRCS.CFG files respectively.
Step 1:
;===============================================================
; Settings for SMTP mail
;===============================================================
SMTPServer=PSP-SMTP-01<---- name of your SMTP server (this can also be the
IP address of the SMTP server)
-------------------------------------------------------------------------------
SMTPPort=25 <---- port number for your server (usually will be 25)
SMTPServer1=PSP-SMTPG-01 <----- name of backup server (not necessary)
SMTPPort1=25 <---- backup server port number
SMTPSender=PeopleSoft@peoplesoft.com <----- Valid email ID format
SMTPSourceMachine=ts-hp03.peoplesoft.com <------
the IP address of the machine without the
needs to be the machine name of the server being configured, Application
or Process Scheduler, NOT THE NAME OF THE DATABASE YOU ARE CONNECTING TO.
Step 2: check the Emil check box

Friday, August 8, 2008
How to clear cache on any/all of the PeopleSoft Internet Architecture
BEA Application Server
*************************
1) Shutdown Domain(s)
2) Delete all files and folders in %PS_HOME%\appserv\\CACHE
3) Start Domain(s)
BEA WebLogic 5.1/6.1/8.1
************************
1) Stop WebServer Service
2) Delete all files and folders under cache directory
Version 5.1 path --> C:\weblogic\myserver\public_html\PIASite\cache\*
Version 6.1 path -->
C:\bea\wlserver6.1\config\\applications\PORTAL\\cache
Version 8.1 path -->
PS_HOME/webserv//applications/peoplesoft/PORTAL//cache
3) Start WebServer
IBM WebSphere 4
********************
1) Stop WebServer Service
2) Delete all files and folders under cache directory
Version 4.0.x path -->
C:\WebSphere\AppServer\installedApps\peoplesoft\PORTAL\ps\cache
3) Start WebServer
Microsoft Internet Explorer 5.x/6.x
************************************
1) Navigate to Tools > Internet Options > General Tab
2) Click on Delete Files button
3) Close all open instances of the browser as this will clear in-memory
cookies
note: 6.x offers a delete Cookies Button on the same General Tab page
Netscape 4.x/6.x
**************
1) Navigate to Edit, and select Preferences on the Netscape menu bar
2) Click Advanced
3) Click Cache
4) Click the Clear Memory Cache button
5) Click the Clear Disk Cache button
6) Click OK
Mozilla Firefox 1.x
***************
1) Navigate to Tools and select Options
2) Select the Privacy section
3) Select the Cache tab
4) Click the "Clear Cache Now" button
5) Click OK
How do I delete personalizations for portal users? (Deleting User Homepage Cache)
It is possible to delete cache while a server is online. For example:
http://cit-srv-one:8020/psp/ps/EMPLOYEE/QE_LOCAL/c/WEB_PROFILE.WEB_PROFILE.GBL?cmd=purge&pwd=dayoff
The command to purge purges the webserver cache. The password dayoff is
an example. You would need the webserver's configured audit password
here.
*************************
1) Shutdown Domain(s)
2) Delete all files and folders in %PS_HOME%\appserv\
3) Start Domain(s)
BEA WebLogic 5.1/6.1/8.1
************************
1) Stop WebServer Service
2) Delete all files and folders under cache directory
Version 5.1 path --> C:\weblogic\myserver\public_html\PIASite\cache\*
Version 6.1 path -->
C:\bea\wlserver6.1\config\
Version 8.1 path -->
PS_HOME/webserv/
3) Start WebServer
IBM WebSphere 4
********************
1) Stop WebServer Service
2) Delete all files and folders under cache directory
Version 4.0.x path -->
C:\WebSphere\AppServer\installedApps\peoplesoft\PORTAL\ps\cache
3) Start WebServer
Microsoft Internet Explorer 5.x/6.x
************************************
1) Navigate to Tools > Internet Options > General Tab
2) Click on Delete Files button
3) Close all open instances of the browser as this will clear in-memory
cookies
note: 6.x offers a delete Cookies Button on the same General Tab page
Netscape 4.x/6.x
**************
1) Navigate to Edit, and select Preferences on the Netscape menu bar
2) Click Advanced
3) Click Cache
4) Click the Clear Memory Cache button
5) Click the Clear Disk Cache button
6) Click OK
Mozilla Firefox 1.x
***************
1) Navigate to Tools and select Options
2) Select the Privacy section
3) Select the Cache tab
4) Click the "Clear Cache Now" button
5) Click OK
How do I delete personalizations for portal users? (Deleting User Homepage Cache)
It is possible to delete cache while a server is online. For example:
http://cit-srv-one:8020/psp/ps/EMPLOYEE/QE_LOCAL/c/WEB_PROFILE.WEB_PROFILE.GBL?cmd=purge&pwd=dayoff
The command to purge purges the webserver cache. The password dayoff is
an example. You would need the webserver's configured audit password
here.
Enabling the Help Link from the Application Pages
Each page in your PeopleSoft applications includes a Help icon that, when clicked, opens a new browser window displaying help topics that discuss that page.
To enable the Help link from application pages:
1. In your PeopleSoft application, navigate to the PeopleTools, Web Profile, Web Profile Configuration page.
2. Click Search and select the Profile Name you specified during your PeopleSoft Pure Internet Architecture installation.
3. Change the value for the Help URL field by replacing the "helpweb server" string with the domain name and port number of your web server. Also, if you installed to a directory other than "htmldoc" (the default), replace "htmldoc" accordingly.
Example:
If your PSOL server is named “mywebserver” and listens to port 5080, you would modify the default
Help URL from:
http://helpweb server/htmldoc/f1search.htm?ContextID=%CONTEXT_ID%&LangCD=%LANG_⇒CD%
to:
http://ctg-srv-one:8020/PSOL/htmldoc/f1search.htm?ContextID=%CONTEXT_ID%&LangCD=%LANG_CD%
Note. The system resolves %CONTEXT_ID% to the page name from which you called help. The system
resolves %LANG_CD% to the signon language of the user.
Note. If you do not want the Help icon to display in your applications, clear the Help URL field value.
Note. The default port for PSOL in a WebLogic multi-server domain installation is 6001.
4. Save and exit the Web Profile Configuration page.
5. Before testing help functionality, purge the browser cache on the client and close all web browsers.Restart the application server and web server for PIA.
6. Test the help functionality by clicking the Help icon on a PeopleSoft application page.

How do I successfully configure verity search in Peopletools ?
Make sure that the verity installation path is added to the System's 'PATH' environment variable on the server: %PS_HOME%\verity\winx86\_nti40\bin
(Note : Please REPLACE the %PS_HOME% with the PS_HOME path)
Also, clean the web server and browser cache, and MAKE SURE TO REBOOT the WebServer machine (not just Stop and start webserver, but restart the system) for the changes to take effect and check if the issue still persists.
Note: Multiserver domain users must make below changes in set_psol_env file before performing other steps:
If you are using a Multiserver domain the port number to access Peoplebooks should be of PSOL, default is 6001.
Open set_psol_env.bat or sh from the location
e.g\webserv\peoplesoft\applications\peoplesoft\PSOL\htmldoc\admin
Make sure, set PSOL_SERVERNAME value is set to PSOL not PIA. Set PSOL_SERVERURL should show the hostname and port number of PeopleBooks. Check below......
set PSOL_SERVERNAME=PSOL
set PSOL_SERVERURL=HTTP://:9999
To enable the Help link from application pages:
1. In your PeopleSoft application, navigate to the PeopleTools, Web Profile, Web Profile Configuration page.
2. Click Search and select the Profile Name you specified during your PeopleSoft Pure Internet Architecture installation.
3. Change the value for the Help URL field by replacing the "helpweb server" string with the domain name and port number of your web server. Also, if you installed to a directory other than "htmldoc" (the default), replace "htmldoc" accordingly.
Example:
If your PSOL server is named “mywebserver” and listens to port 5080, you would modify the default
Help URL from:
http://helpweb server/htmldoc/f1search.htm?ContextID=%CONTEXT_ID%&LangCD=%LANG_⇒CD%
to:
http://ctg-srv-one:8020/PSOL/htmldoc/f1search.htm?ContextID=%CONTEXT_ID%&LangCD=%LANG_CD%
Note. The system resolves %CONTEXT_ID% to the page name from which you called help. The system
resolves %LANG_CD% to the signon language of the user.
Note. If you do not want the Help icon to display in your applications, clear the Help URL field value.
Note. The default port for PSOL in a WebLogic multi-server domain installation is 6001.
4. Save and exit the Web Profile Configuration page.
5. Before testing help functionality, purge the browser cache on the client and close all web browsers.Restart the application server and web server for PIA.
6. Test the help functionality by clicking the Help icon on a PeopleSoft application page.

How do I successfully configure verity search in Peopletools ?
Make sure that the verity installation path is added to the System's 'PATH' environment variable on the server: %PS_HOME%\verity\winx86\_nti40\bin
(Note : Please REPLACE the %PS_HOME% with the PS_HOME path)
Also, clean the web server and browser cache, and MAKE SURE TO REBOOT the WebServer machine (not just Stop and start webserver, but restart the system) for the changes to take effect and check if the issue still persists.
Note: Multiserver domain users must make below changes in set_psol_env file before performing other steps:
If you are using a Multiserver domain the port number to access Peoplebooks should be of PSOL, default is 6001.
Open set_psol_env.bat or sh from the location
e.g
Make sure, set PSOL_SERVERNAME value is set to PSOL not PIA. Set PSOL_SERVERURL should show the hostname and port number of PeopleBooks. Check below......
set PSOL_SERVERNAME=PSOL
set PSOL_SERVERURL=HTTP://
Enabling peoplesoft F1 Search
This procedure describes how to enable F1 help for Application Designer, PeopleCode Editor, and other Windows-based PeopleSoft programs.
To enable F1 help:
1. Sign on to your PeopleSoft application using your browser.
2. Navigate to the PeopleTools, Utilities, Administration, PeopleTools Options page.
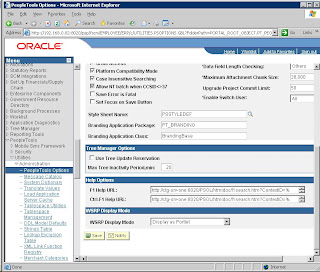
3. Enter the same URL as set in webprofile for online search (where// reflects your installation) into the F1 Help URL field:
http://ctg-srv-one:8020/PSOL/htmldoc/f1search.htm?ContextID=%CONTEXT_ID%&LangCD=%LANG_CD%
4. Save the page.
To enable F1 help:
1. Sign on to your PeopleSoft application using your browser.
2. Navigate to the PeopleTools, Utilities, Administration, PeopleTools Options page.
3. Enter the same URL as set in webprofile for online search (where
http://ctg-srv-one:8020/PSOL/htmldoc/f1search.htm?ContextID=%CONTEXT_ID%&LangCD=%LANG_CD%
4. Save the page.

Wednesday, August 6, 2008
useful Links
LIBTUX_CAT:681: ERROR: Failure to create message queue
http://iambic.homeip.net/site/doku.php/tech/psoft/install_psoft_on_gentoo
Some examples of using UNIX find command
http://www.athabascau.ca/html/depts/compserv/webunit/HOWTO/find.htm
PeopleSoft IB setup Url.
http://docs.huihoo.com/oracle/docs/B14099_19/integrate.1012/b14060/int_broker.htm
Rman Recovery From Backupset In Different Location From Backup Location
http://www.orafaq.com/forum/t/118731/0/
Linux Users and Sudo
http://www.linuxhomenetworking.com/wiki/index.php/Quick_HOWTO_:_Ch09_:_Linux_Users_and_Sudo
Data Mover
https://heprod.georgetown.edu/htmldoc/eng/psbooks/tdam/chapter.htm?File=tdam/htm/dmcomt02.htm
Setting up Build Search Collection for Solution Advisor
http://www.peoplesoft.com/psp/portprd/CUSTOMER/CRM/c/C1C_MENU.C1_SOLN_SUMMARY.GBL?page=C1_SOLN_SUMMARY&SETID=SHARE&SOLUTION_ID=201049808
Wednesday, July 30, 2008
The Minimum Access Needed for Project Migration and Project Build
The Minimum Access Needed for Project Migration and Project Build
With the following Security setup, the User will be able to successfully migrate
Projects between two environments:
1-Create a new Permission List called TEST.
2-Go to 'Definition Permissions', change 'Project ' to 'Read only', save it, then change it back to 'Full Access'.
3-Go to 'Tools Permission' and change ' Upgrade' to 'Full Access'
4-Save and close out of the Permission List
Create a new Role named TEST and assign the TEST Permission List to this new Role.
1-Save and close out of the Role
2-Create a new User called TEST and assign the TEST Role to this User.
3-Add the PeopleSoft User Role to the TEST User
4-Save and close out of the User Profile
With the following Security setup, the User will be able to successfully build a Project:
1-Create a new Permission List called TEST1
2-Go to 'Definition Permissions', change 'Project ' to 'Read only’. save it then change it back to 'Full Access'
3-Go to 'Tools Permission' and change ' Build / Data Admin' to 'Full Access'
Save and close out of the Permission List
4-Create a new Role named TEST1 and assign the TEST1 Permission List to this new Role.
5-Save and close out of the Role
6-Create a new User called TEST1 and assign the TEST1 Role to this User.
7-Add the PeopleSoft User Role to the TEST User
8-Save and close out of the User Profile
Friday, April 18, 2008
Change the Access ID password in Peoplesoft
Path 1 : Log into Data Mover as the Access ID (Bootstrap mode).
Then run this command:
CHANGE_ACCESS_PASSWORD sa1 (This is your symbolic ID) cloud123 (This is the new password for the Access ID);
And hit the Green traffic light.
NOTE - This method does NOT work in PT 8.14 or 8.15, but is now fixed in PT 8.16 (T-JPELAY-AU4QW) so use method 2 or method 3. You MUST also make sure that the password for the Access ID has successfully been changed at the Database level because prior to PT 8.17 this method would not change the database level password. To do this go through your SQL tool (SQL Plus, Query Analyzer) and make the change in the database users table.
Path 2: - (Second best method) You need to change the Access ID Password at database level then log into Data Mover in bootstrap mode and run:
update PSACCESSPRFL set ACCESSID = 'what your Access ID is' , ACCESSPSWD = 'your New Access Password' , ENCRYPTED = 0, where SYMBOLICID = 'whatever the SYMBOLICID is';
Then run
ENCRYPT_PASSWORD *;
Note: If you have more than 45,000 rows in the PSOPRDEFN table then you may not be able to run the ENCRYPT_PASSWORD *; command in Data Mover. In that case just logon as a valid user in 2 tier and that will encrypt the Access ID in the PSACCESSPRFL table.
This will synch up the PSACCESSPRFL table with the same password stored at the database level for your Access ID.
Path 3 : - (Last and most discouraged method) Go into Application Designer / Tools / Miscellaneous Objects / Access Profiles.
Highlight the Symbolic ID and push the Edit button, enter the old password, new password, and confirm new password.
If you change it in Application Designer it does not change at the database level. This is because we do not GRANT to the database in PT 8. You MUST also make sure that the password for the Access ID has successfully been changed at the DB level. To do this go through your SQL tool (SQL Plus, Query Analyzer) and make the change in the database users table.
Subscribe to:
Posts (Atom)